Search This Blog

Monday, September 30, 2013

Kaisercraft 9 frame photo display- Mothers Day Project

Kaisercraft Nine Photo Frame Display as is when you purchase.


I painted mine in a beige colour all over and painted the inner edges with a pink paint, then went over the entire frame with some gold acrylic paint. I then attached a piece of pattern paper to the back of the frame and a attached it all together.  The patterned paper didn't quite fit but that didn't bother me as i new i would be filling up the sections.

The angel word was also a kaisercraft wooden item, which i painted in the same colour as the frame. I attached it to the frame at the very end when i was finished embellishing the frame, I also attached a gold chain from my stash so that i would be able to hang it.
Before I embellished i cut the Photos to size and arranged them in the frame sections.  Some of the embellishments I used where hand made like the crochet flower,the little quote signs, cherish sign and for you sign, and the other embellishments used where bought embellishment which i altered to fit my project.

 This heart was yet another kaisercraft wooden element, which I firstly painted pink and attempted in doing a crackle finish, the crackle did work but was very small which wasn't exactly what i wanted, i wanted more of the pink to show through, but i tried to make it work none the less. I added some bling in the frame section and also an altered felt letter "U" with brown embossing powder, so it would represent the words "love you", in the middle of the gold crackle heart i added a brown heart brad with the prongs cut off so that it would lay flat. I also added a ceramic yellow and pink butterfly to break up a bit of the gold. To the left of the frame section is a flower that i put together.  I started off with a crochet flower i had made, i added a pink flower underneath and a brown glittery flower on top and to finish it off i used a turquoise flat back pearl.


For the middle section i made a little sign which i stamped in brown in and then embossed with clear embossing powder, i then glued two pink gem stone brads on either side which i had removed the back prongs in order to lay flat.
The main focal quote "To the world you're just one person , but to one person you are the world" was initially placed onto some vellum but didn't stand out enough for me, so i backed it onto some thick turquoise pattern paper and decorated it with some gems and pearls.  However since i made it, it had started to curl a touch which i wasn't to happy about so i was able to take it off and back it with chipboard, coloured it with the appropriate turquoise colour and then to give it even more strength i covered the top with glossy accents and so far its doing good.  :)
The last item for this section was the wing and crown heart charm, these are two separate items which i attached to make my own little angel heart charm, to fit my project perfectly, around the charm i also placed some tiny butterfly rub ons.


In this section i placed this beautiful felt butterfly which i happened to have in my stash and thought it went perfectly for this project. I jazzed it up by placing some pink gem stones down the middle of the butterfly and some different sized pearls to either side and an epoxy sticker saying "family times" which goes well with the picture below it.


For this section i had coloured up a doily with some pink ink and layered on a quote sticker. I spruced up the sticker with some corner rub ons and some butterfly rub on as well, grunged up the sticker and edged it with some turquoise. I also adhered two tiny  heart beads on the top and a faux metal sticker on the bottom of the doily.  To the right i glued a simple spray of flowers down which i sprayed with some homemade pink shimmer spray and place another flower set on the bottom.


Lastly in this section i adhered some metal word charms to this photo which i believe represents my mum.  :) 

♥♥♥
30th Birthday Exposion Box Mini


This is an explosion box that i made for a very good friend of mine who was turning 30!


All if the layers where cut from a 12x12" pattern paper, there are 3 layers on each side which intern create the box's sides and are held in place by the lid.  On each side layer I've made a photo mat to accompany the photo and have then embellished it accordingly.
The cake tier in the middle of the box was made using old ribbon spools and then decorated with pattern paper and ribbon to look like a cake


Side view of the butterflies which explode out of the box


The box tied up and ready to be delivered! :)


Saturday, September 28, 2013

Gel medium Image Transfer Canvas - 60th Birthday Gift


 This is a canvas I made for my mum, for her 60th birthday.  
I started out by gessoing the canvas and applying the laser printed picture onto the dried canvas face down with gel medium. I smoothed it out and then just let it dry overnight in order to transfer the photo onto the canvas - Visit http://www.youtube.com/watch?v=sib94a4XgvA for a tutorial. Note: since completing this canvas many more tutorials have come out stating that a toner based copy is not needed!

 Once the photo was revealed I proceeded to decorate my canvas with some stamping, adding some handmade flowers and embellishments as well as  package flowers and embellishments, gem flourishes, pearl trims, and to finish it off a piece of lace trim around the edge of the canvas.
 
♥ ♥ ♥

60th Easel Birthday Card For the Best Mum!

This card is a special card I made for my mums 60th birthday.  It is a 5.5"x 5.5" easel card. I used a cream coloured card base and a fair few layers .
On the front of the cars i layered a 5x5" piece of patterned paper which had a beautiful design of a cherry blossom which i covered the branches with glitter glue to give it an extra sparkle and the cherry blossoms I covered with glossy accents to give them shine and dimension. I made sure to position this image to the right of the card front, I also place a white and slightly holographic butterfly sticker just below the cherry blossom image, and stamped my sentiment to the left of the sticker.  


 The number 60 for the card was just some pre cut thin cardboard numbers which I had purchased in a packet from my local craft shop,  I coloured the numbers with some pink pigment ink and then I embossed them both with some glitter embossing powder.
 To complete the front portion of the card i sponged the edge with a turquoise colour ink, and because the card base I used was cream it gave it a slight greenish quality.
 
 As this is an easel card I needed to create a part of the card so that it would hold up the front panel of the card, in order for it to stand up on its own to be displayed.  

To do this I created two panels which I layered on top of each other one measuring 5.5x 2.5" which I coloured with pink ink to match with the numbers on the front , I also punched out a scalloped border placed some pink gem stoned on each scallop loop and on the far ends I placed felt flower stickers which would also help to keep the front panel in place.  
The second layer measuring 5x2.25", I coloured turquoise, stamped and embossed my sentiment and also punched out a border on the top using the fiskars lace punch, I also placed another glittery butterfly sticker to the left of the sentiment, and that's pretty much the card ;)
Side view


Friday, September 27, 2013

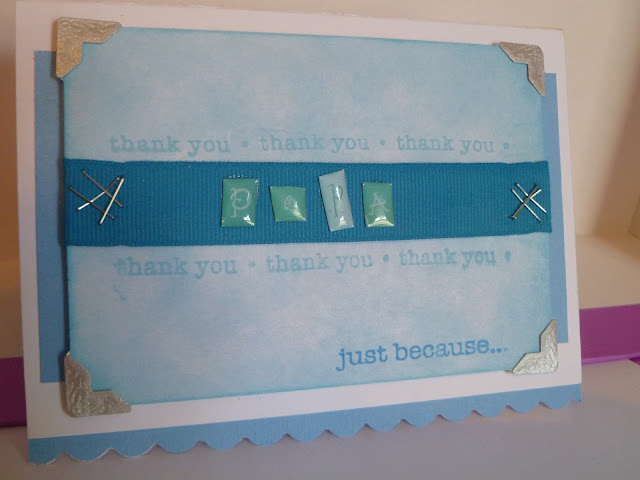
A Card For My Dad... "PAPA" = )

I started out with a white card base here, as this card was for my dad (papa in Italian) and his favourite colour is light blue I placed a piece of blue card stock in the background and a scalloped blue border along the bottom.  The main portion of the front of the card was a white piece of card stock the I coloured with some blue ink, blending it with a sponge so that it would have a subtle and soft appearance, on the corners of this piece I also placed some silver photo corners.  Before attaching it to  the card base I stamped some sentiments in different shades of blue, placed a blue ribbon along the middle of the card piece and attached this ribbon with some staples and epoxy stickers spelling 'papa'


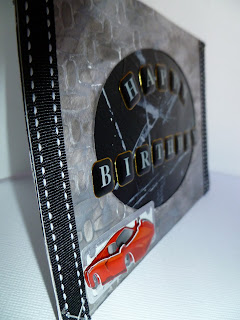
Retro Style Male Birthday Card

Background on this card is embossed with a fiskars texture plate (basket-weave) which once I panted it with silver paint looked to me like the pattern on certain car pedals, which is what gave me  the idea of going along with the car theme


The middle of this particular card base had an oval window, however I backed it with a black piece of card which I had painted with more silver paint in a linear pattern

Here I show the dimension of the epoxy stickers I used

Inside the card I've stamped a few birthday sentiments and have added the same ribbon which I used on the outer of the card


Monday, April 22, 2013

New Baby Girl Card


 I've used a cream colour base for this card, and placed a chequered pink layer of card stock onto the base card.  Before adhering the pink layer, I made a scalloped border for the opening side of the card, which is also a lighter pink with polka dots.  I've placed a pink square frame in the middle of the card, which has slight dimension and texture to it.  In the middle of the frame I've placed a chipboard embellishment on pop dots to give it some more dimension.  For the border of this card  I've used some soft pink grosgrain ribbon and finished three corners off with a pink laced button.  In the last corner I die cut a flower shaped base and a circle die cut to fit into the flower base.  The circle die cut piece is stamped with a pink pigment ink and a little bling decorates the centre of the stamped flower.


Saturday, April 20, 2013

Baby Boy Card


 Blue and green themed card for the arrival of a baby boy named Louis......I have used a few different textures on this card, from the paper and the alphas used to some embossing and epoxy sticker.


 Some close ups of the front of the card where I've incorporated some stamping in green pigment ink and set it with clear embossing to give it a shiny raised look.  The alphas have been placed on some punched out circle glitter paper to give that extra sparkle to the card.  To balance the new arrival circle which is popped up on some dimensionals  i have added a green button brad to keep the coloured theme consistent. 


 A green ribbon placed in the centre and a blue epoxy baby elephant sticker, some green bling and we've got ourselves a card =)


Thursday, April 11, 2013

Baby Girl Card

 
              Individualised card for a baby girl... Using several pink shades.
Some dry and heat embossing has been used for the front of the card and also for the handmade glittered flower. 

Closer look at the handmade glittered flower- I used a fabric flower base i placed some versa mark to ad hear some Utee and alternated between layers of Utee and pink glitter.
Clear embossing over the baby lettering and holographic embossing over the name for added sparkle!
 
Inside of card

Finished the card with a simple side bow...
Dimension but not too bulky...